Hidden fixings for an Ipe slatted fence
Hidden clips let you fix the slats of a fence without a single screw on show. You screw the clip to the post, the slats lock into it with their groove, and the clip sets a 5 mm gap at the same time. Every Ipe slatted fence from Hardwood Discount comes with the clips and screws in the kit, together with the posts and slats.
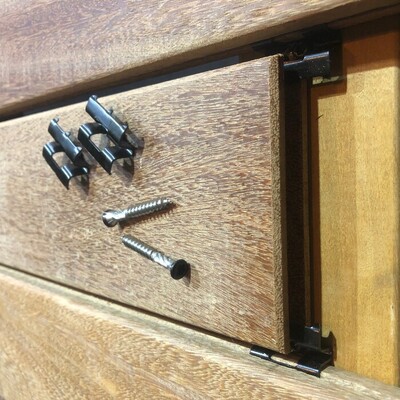
How does a hidden fence clip work?
Our slats are 2.1 cm thick and 5, 7 or 9 cm wide, with a groove along the top and bottom edge. The clip is stainless steel with a black coating. Its two wings grip the groove of the slat below and the slat above, and a single screw fixes it to the 6 x 6 cm Azobé post.
Because the clip is black and sits deep in the gap, it disappears into the shadow line. From the front you only see timber and a clean 5 mm gap.
Hidden clips or face screwing?
- No screw heads in the slats, so no holes for water to get into.
- The same gap everywhere. The clip doubles as the spacer, so there is nothing to measure.
- Quicker to fit. The screws are self-drilling, so no pre-drilling.
- Very little waste. The slats click together end to end with a tongue and groove, so a slat doesn't have to finish on a post.
A couple of things to bear in mind. The system needs a level start: if the first slat isn't level, the error carries all the way up. And the top slat has nothing above it, so a full clip won't fit there. Fix it with half a clip, or screw at an angle through the groove into the post. That is the only place you pre-drill.
Fitting the clips, step by step
- Set the posts. Azobé posts about 1 metre apart, upright and in line, with 2 posts at a corner. For full privacy, fix black EPDM sheeting to the posts first.
- First slat level. Work from the bottom up. The first row sets the whole fence.
- A clip at every post. Press the clip fully into the groove and fix it to the post with one screw.
- Clips at the end joints. Fit a clip at the top and bottom of every joint between two slats. If there is no post behind the end of a slat, still fit 2 clips.
- Slat on slat. Press the next slat onto the clips. If the gap is wider than 5 mm, the clip or the slat isn't seated properly.
- Top slat. Fix it with half a clip, or at an angle through the groove into the post.
How many clips do you need?
You don't need to work it out yourself. We put the kit together for your length and height, with every post, slat, clip and screw. A narrow 5 cm slat gives you more rows, and so more clips, than a 9 cm slat.
Replacing a slat without taking the fence down
If a slat gets damaged later on, there is no need to take the fence apart. Cut through the clips above and below it, lift it out, and fix the new one with fresh clips that you slide along the groove to the post.
Which fences use this clip system?
- Ipe slatted fence, 5 cm slats: fine lines, the most rows.
- Ipe slatted fence, 7 cm slats: the middle size.
- Ipe slatted fence, 9 cm slats: fewer gaps, a calm look.
- Ipe fence with mixed slats: 5, 7 and 9 cm combined.
See every option under wood slat fencing. Building a deck as well? Read about hidden deck fixings, where the gap is 8 mm.
Slatted fence fixings: your questions
Are the clips and screws included?
Yes. Every Ipe slatted fence comes with all the clips and screws in the kit, along with the posts and slats. If you need extra clips, for a repair for example, just ask our advice team.
Do I need to pre-drill?
No, the screws are self-drilling. You only pre-drill if you fix the top slat at an angle through the groove into the post.
How wide is the gap between the slats?
5 mm. The clip is also the spacer, so the gap is the same everywhere. On decking boards the gap is 8 mm.
Can EPDM sheeting go behind the slats?
Yes. The sheeting goes against the posts and the clips and slats are fitted over it. That gives full privacy and cuts down noise.
Where do the extra clips go?
One clip at every post, plus a clip at the top and bottom of every joint between two slats, even where there is no post behind it.